


What is an Arduino Nano Board?
Catalog
Arduino Nano FeaturesArduino Nano PinoutDifference Between Arduino UNO and Arduino NanoApplications of Arduino UNO and Arduino NanoFrequently Ask QuestionsThe Arduino Nano is a compact microcontroller board designed by Arduino.cc, featuring the Atmega328 microcontroller, the same one used in the popular Arduino UNO. Known for its small size and versatility, it’s ideal for a variety of projects, from electronics to robotics and embedded systems. Due to its smaller footprint and unique pin layout, it’s often chosen as a more space-efficient alternative to the Arduino UNO in applications where compactness matters.
While the Arduino Nano offers similar functionality to the Arduino Duemilanove, it has a different form factor. Unlike some of the larger boards, it doesn’t have a DC jack. Instead, it gets power through a mini USB port or directly via the VCC and GND pins. It supports an input voltage range of 6 to 20 volts via the mini USB.
The Arduino Nano is perfect for beginners who want to dive into electronics without the complexity of larger systems. Other popular Arduino boards include the Arduino Mega, Arduino Pro Mini, Arduino YUN, and Arduino Leonardo, among others. If you're exploring more advanced platforms, you might also consider development boards like the Raspberry Pi, ESP32, or Intel Edison.
Arduino Nano Features
The Arduino Nano comes with a range of features that make it a versatile choice for many projects:
- Microcontroller: ATmega328P (8-bit AVR family)
- Operating Voltage: 5V
- Input Voltage (Vin): 7V to 12V
- Input/Output Pins: 22 total
- Analog Input Pins: 6 (A0 to A5)
- Digital Pins: 14
- Power Consumption: 19 mA
- Max I/O Pin DC Current: 40 mA
- Flash Memory: 32 KB
- SRAM: 2 KB
- EEPROM: 1 KB
- Clock Speed: 16 MHz
- Weight: 7g
- Board Dimensions: 18 x 45mm
- Supports Communication Protocols: SPI, I2C, and USART
Arduino Nano Pinout
Below is the pinout diagram of the Arduino Nano, with details on the function of each pin.
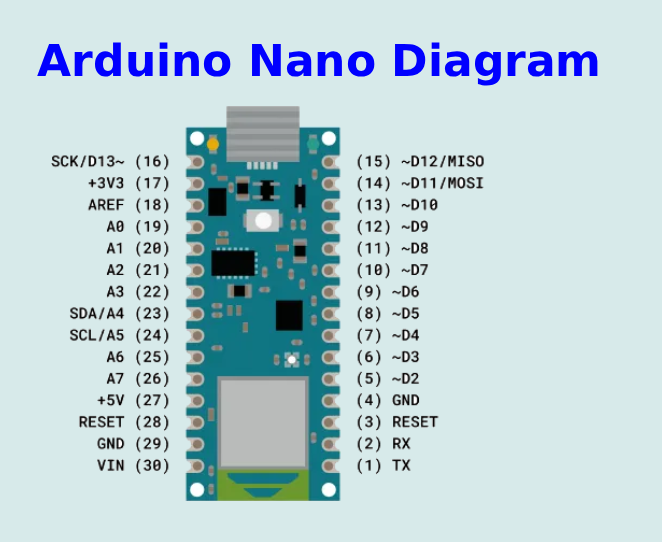
Power Pins (Vin, 3.3V, 5V, GND)
- Vin: This is the input voltage for the board. Use it when powering the Nano with an external source (7V to 12V).
- 5V: The regulated power supply voltage for the Nano. This powers the board and its components.
- 3.3V: The minimum voltage generated by the board's voltage regulator.
- GND: Ground pin for the board.
RST Pin (Reset)
Used to reset the microcontroller.
Analog Pins (A0-A7)
Used to read analog voltage in the range of 0V to 5V.
I/O Pins (Digital Pins D0 – D13)
These pins can be used as input or output (0V & 5V).
Serial Pins (Tx, Rx)
Used for transmitting and receiving TTL serial data.
External Interrupts (Pins 2, 3)
These pins can trigger interrupts.
PWM (Pins 3, 5, 6, 9, 11)
These pins support 8-bit PWM output.
SPI (Pins 10, 11, 12, 13)
Pins for supporting SPI (Serial Peripheral Interface) communication.
Inbuilt LED (Pin 13)
Used to control the onboard LED.
I2C (Pins A4, A5)
These pins support TWI (Two-Wire Interface) communication.
AREF
This pin provides a reference voltage for analog input.
Difference Between Arduino UNO and Arduino Nano
Here’s a quick comparison of the two boards:
- Size: The Arduino UNO is larger. The Nano is about 2.5 inches by 0.8 inches, while the UNO is around 2.7 inches by 2.1 inches.
- Pin Layout: The UNO has 14 digital I/O pins, 6 analog inputs, and additional pins for power and communication. The Nano has 22 digital I/O pins, 8 analog inputs, and similar power and communication pins.
- Power: The UNO has a DC power port and can be powered by either an external source or a USB connection. The Nano, however, lacks a DC power port and can only be powered through USB or an external source.
- Common Features: Both boards include a microcontroller, clock crystal, and USB port. The Nano has a mini USB connector, while the UNO has a full-size USB connector, a power jack, and an ICSP header.
- Compatibility: Both are compatible with a variety of sensors and actuators and can be programmed using the Arduino IDE.
- Price: The Nano is generally more affordable than the UNO.
Though both boards share similar features, the best choice depends on the needs of your specific project. The Nano is great for projects with space constraints, while the UNO offers more flexibility with its larger size and additional features.
Applications of Arduino UNO and Arduino Nano
Both the Arduino UNO and Arduino Nano are powered by the ATmega328 microcontroller, making them perfect for a variety of applications:
- Device Control: These boards can control devices like LEDs, motors, and LCD displays. They also support compatibility with shields and other expansion boards.
- Sensor Interface: With their analog and digital I/O pins, both boards can interface with sensors to collect and measure data.
- Common Applications: They are commonly used in home automation systems, weather stations, and remote monitoring systems.
- Easy Prototyping: Thanks to their popularity and ease of use, these boards are widely used for prototyping and integrating with other electronics and microcontrollers.
- Robotics: The boards are great for building and controlling robots, either as standalone microcontrollers or as part of larger robotic systems.
Arduino Nano Communication
The Arduino Nano can communicate with other devices such as computers, other Arduino boards, or microcontrollers. Using the ATmega328 microcontroller, the board supports serial communication (UART TTL) via the TX and RX pins. The Arduino IDE includes a serial monitor for sending and receiving text-based data between the board and your computer.
The TX and RX LEDs on the board blink when data is transmitted via the FTDI and USB connection. The SoftwareSerial library enables serial communication on any of the Nano’s digital pins. Additionally, the microcontroller supports both SPI and I2C (TWI) communication protocols for more complex setups.
Arduino Nano Programming
Programming the Arduino Nano is easy with the Arduino IDE. Simply select the Nano board from the Tools menu to get started. The ATmega328 microcontroller on the Nano comes pre-loaded with a bootloader, which makes uploading new code easy without needing an external programmer.
The bootloader uses the STK500 protocol to communicate. For advanced users, the bootloader can be bypassed, and you can program the microcontroller directly using an in-circuit serial programming header (ICSP) with an Arduino ISP.
Applications of Arduino Nano
The Arduino Nano is commonly used in a wide range of projects where you need to read inputs (from sensors, buttons, or even a fingerprint) and provide outputs (such as controlling motors or LEDs). Some of the key applications include:
- Prototyping of electronic systems and products
- Automation of processes and tasks
- A variety of DIY projects
- Control systems for managing devices or processes
- Embedded systems for specific, dedicated tasks
- Robotics for building and controlling robots
- Instrumentation for measuring and controlling physical variables
The Arduino Nano is a highly recommended choice, especially for beginners. With its low cost and ease of use, it’s perfect for various applications. The board connects easily to any computer via its mini USB port, making it an accessible option for those just starting out in electronics.
Frequently Ask Questions
Bonus Question: What is an Arduino Nano Driver?
An Arduino Nano driver is a piece of software that allows your computer to recognize and communicate with the Arduino Nano board via USB. It enables the Arduino IDE (Integrated Development Environment) to upload code to the board and ensures that the computer can detect and interact with the Nano as a serial device.
What is an Arduino Nano board?
The Arduino Nano is a small, open-source microcontroller board that’s easy to use on a breadboard. It’s based on the Microchip ATmega328P microcontroller (MCU) and was developed by Arduino.cc. First released in 2008, it’s a compact yet powerful tool for building electronic projects.
What can Arduino Nano be used for?
Perfect for prototyping and IoT (Internet of Things) projects, the Arduino Nano is popular among makers, students, and engineers. Its small size and robust features make it ideal for robotics, embedded systems, and creating compact, high-performance devices. Whether you’re experimenting or building something new, it’s a great choice for many projects.
Which is better, Arduino Uno or Nano?
The Arduino Nano is often preferred because it plugs directly into a breadboard, making it more convenient for certain projects. With the Arduino Uno, you have to connect wires to the breadboard. However, the Nano doesn’t have the same built-in power jack that the Uno does, which can be a downside for some users. Personally, I use a Varta battery charger to convert 240VAC to a 12VDC output for projects.
Is it legal to sell Arduino projects?
Yes! If you’ve created something original using the Arduino platform, you can sell it commercially. As long as your project doesn’t directly use someone else’s open-source design or code, you’re free to profit from it.
Can ChatGPT write Arduino code?
Yes, ChatGPT can help write Arduino code. After you receive your code from ChatGPT, just click the “Copy Code” icon to copy it to your clipboard. Then, you can paste it into the Arduino IDE, upload it to your board, and watch it work!
Does NASA use Arduino?
Yes, NASA has used the Arduino Mega in space missions. It helped manage communication between a local XBee wireless network and an Iridium satellite uplink. NASA’s use of commercial off-the-shelf components, like Arduino, supports their approach of using rapid prototyping to test and explore new ideas.
Can Raspberry Pi replace Arduino?
While Arduino is great for controlling motors, LEDs, and sensors, the Raspberry Pi is better suited for software development and running more complex applications. The two have different power needs: Raspberry Pi requires more current than Arduino, although both can be powered via USB.
Which Arduino is best for beginners?
For beginners, the Arduino Uno is often the best choice. It’s the most popular board and has a simple design that’s easy to use. Plus, there are tons of tutorials, guides, and community support available, making troubleshooting and learning easier.

Christopher Anderson
Christopher Anderson has a Ph.D. in electrical engineering, focusing on power electronics. He’s been a Senior member of the IEEE Power Electronics Society since 2021. Right now, he works with the KPR Institute of Engineering and Technology in the U.S. He also writes detailed, top-notch articles about power electronics for business-to-business electronics platforms.
Subscribe to JMBom Electronics !


