
Raspberry Pi 4 Model B: Pinout, Specs, Features & Use Cases
Catalog
What Is the Raspberry Pi 4 Model B?How Does the Raspberry Pi 4 Model B Work?Raspberry Pi 4 Model B Pinout DiagramFeatures and Specifications of Raspberry Pi 4 Model BHow to Set Up the Raspberry Pi 4 Model BInterfacing Raspberry Pi 4 Model B with an Ultrasonic SensorComponents & Connections: Raspberry Pi 4 with Ultrasonic SensorHow the Ultrasonic Sensor WorksAdvantages and DisadvantagesApplications of Raspberry Pi 4 Model BRelated ArticlesThe Raspberry Pi is a compact, credit-card-sized computer known for its versatility and affordability. It’s widely used in education, general computing, and a wide range of DIY and professional projects. These low-cost, small-form-factor boards can interface with the real world via their General Purpose Input/Output (GPIO) pins.
Raspberry Pi boards come in various series, including the flagship models like the Model A+, Raspberry Pi 4 Model B, the latest Raspberry Pi 5, the ultra-compact Zero series, the Compute Module for embedded applications, the Pico series for microcontroller projects, and the all-in-one Keyboard series.
Among these, the Raspberry Pi 4 represents the most advanced and capable model in the fourth-generation lineup of single-board computers. This article provides a detailed look at the Raspberry Pi 4 Model B—its pinout, features, hardware specifications, how it connects to other components, how it differs from previous models, and its practical applications.
What Is the Raspberry Pi 4 Model B?
The Raspberry Pi 4 Model B is a compact, affordable single-board computer developed by the Raspberry Pi Foundation. Designed as a flexible platform for building, learning, and prototyping, it’s widely used in educational settings, DIY electronics, home automation, and even as a lightweight desktop PC. This model features a 64-bit quad-core processor, support for dual 4K displays, faster connectivity options like dual-band Wi-Fi, Bluetooth 5.0, and Gigabit Ethernet, along with multiple USB ports for peripheral devices.
How Does the Raspberry Pi 4 Model B Work?
The Raspberry Pi 4 Model B functions as a fully capable, energy-efficient computer. It runs operating systems such as Raspberry Pi OS and uses onboard components—including a central processing unit (CPU), graphics processing unit (GPU), random access memory (RAM), and a variety of input/output (I/O) ports—to handle a wide range of computing tasks. Everything is integrated onto a single compact board, making it ideal for both standalone and embedded applications.
Raspberry Pi 4 Model B Pinout Diagram
The pinout diagram of the Raspberry Pi 4 Model B is shown below. This board features a 40-pin GPIO header, and each pin serves a specific function. The details and functions of these pins are explained in the following sections.
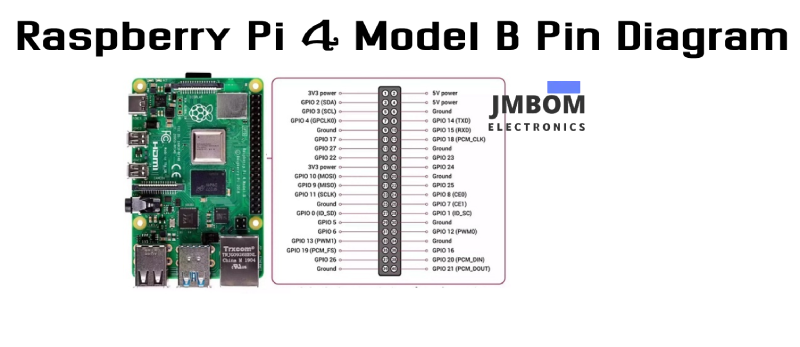
Raspberry Pi 4 Model B Pinout Diagram
Power and Ground Pins
The Raspberry Pi 4 Model B includes dedicated power and ground pins, such as 5V, 3.3V (3V3), and GND (Ground, 0V). These pins are used to supply power to connected components like sensors—for example, humidity sensors or PIR (passive infrared) sensors.
GPIO Pins
The board features a set of General Purpose Input/Output (GPIO) pins used to interface with external devices. These pins can be configured as either input or output, depending on the application.
There are two common naming conventions for these pins:
- BCM (Broadcom) numbering: GPIO pins are labeled GPIO2 through GPIO27. This naming is commonly used when programming in Python with libraries like RPi.GPIO or GPIO Zero.
- Board numbering: Refers to the physical pin numbers from 1 to 40 on the board. This convention is useful when the Broadcom (BCM) mapping is not supported or when using libraries that rely on physical pin positions.
Both conventions help developers choose the appropriate pin references based on their programming environment.
SPI Pins
The Raspberry Pi 4 Model B supports SPI (Serial Peripheral Interface) communication, a protocol commonly used for high-speed, short-distance master-slave data exchange. SPI is useful when connecting to peripherals like sensors, shift registers, and other microcontrollers.
Key SPI pins include:
- MOSI (Master Out Slave In) – used to send data from the Pi to the SPI device
- MISO (Master In Slave Out) – used to receive data from the SPI device
- SCLK (Serial Clock) – provides the clock signal from the master to synchronize data transfer (GPIO11 by default)
In SPI communication, the Raspberry Pi acts as the master. It sends data to the peripheral device via the MOSI pin and receives data back through the MISO pin. All data exchange is timed and synchronized using the SCLK signal.
I2C Pins
The Raspberry Pi 4 also includes support for the I2C (Inter-Integrated Circuit) communication protocol. I2C is a popular, two-wire protocol used to connect multiple devices using just two shared lines:
- SCL (Serial Clock Line) – provides the clock signal to synchronize data transfer
- SDA (Serial Data Line) – carries the actual data between the master and slave devices
In an I2C setup, the Raspberry Pi typically acts as the master, while external components like sensors or displays act as slaves. This protocol is ideal for applications that require connecting multiple low-speed devices with minimal wiring.
UART Pins
The Raspberry Pi 4 Model B supports UART (Universal Asynchronous Receiver/Transmitter) serial communication, commonly used for direct serial connections with other devices such as GPS modules, microcontrollers, or serial consoles.
It includes two main UART pins:
- TX (Transmit) – sends serial data from the Raspberry Pi to another device
- RX (Receive) – receives serial data from an external device
These pins allow the Raspberry Pi to send and receive data asynchronously, enabling simple and efficient communication over a serial interface.
Features and Specifications of Raspberry Pi 4 Model B
The Raspberry Pi 4 Model B is a powerful, energy-efficient single-board computer with the following key features and technical specifications:
- Powered by a 64-bit quad-core ARM Cortex-A72 processor (Broadcom BCM2711) running at 1.5GHz
- Requires a 5.1V / 3A power supply, via USB-C or GPIO header
- Equipped with a 40-pin GPIO header for hardware interfacing
- Supports dual-band Wi-Fi (2.4GHz and 5.0GHz, IEEE 802.11ac) and Bluetooth 5.0
- Includes Gigabit Ethernet for high-speed wired networking
- Available in multiple RAM variants to suit different memory needs
- Features a MIPI DSI (Display Serial Interface) 2-lane port and a MIPI CSI (Camera Serial Interface) 2-lane port
- Offers two micro-HDMI ports, each capable of 4K video output at 60Hz
- Supports H.264 and H.265 video decoding
- Comes with: 1 × USB 3.0 port 2 × USB 2.0 ports 1 × USB-C power input 1 × microSD card slot for OS and data storage 1 × 4-pole stereo audio and composite video output port
- Operating temperature range: 0°C to 50°C (ambient)
- Ideal for use in desktops, embedded systems, robotics, media centers, and IoT projects
How to Set Up the Raspberry Pi 4 Model B
To set up your Raspberry Pi 4 Model B, you’ll need the following components:
- A microSD card (recommended: Class 10, at least 16GB)
- A power supply (5.1V / 3A via USB-C)
- A keyboard and mouse
- A monitor with micro-HDMI support (or adapter)
- An HDMI cable and microSD card reader (for initial setup)
Setup Steps:
- Flash the Operating System Download and install the official Raspberry Pi Imager on your PC or Mac. Use it to flash the Raspberry Pi OS (or another supported OS) onto the microSD card.
- Insert the microSD Card Once the OS is written, safely eject the card and insert it into the Raspberry Pi’s microSD card slot.
- Connect Peripherals Plug in the keyboard, mouse, and monitor to the Raspberry Pi. Use the micro-HDMI port for display and USB ports for input devices.
- Power Up the Board Connect the USB-C power supply to turn on the Raspberry Pi. It will begin booting from the microSD card automatically.
- Initial Configuration On first boot, follow the setup wizard to configure language, time zone, Wi-Fi, and password. Alternatively, for headless setup, you can enable SSH and Wi-Fi before booting by editing files (ssh, wpa_supplicant.conf) on the microSD card.
- Access Remotely (Optional) After initial setup, you can connect to the Raspberry Pi remotely using SSH (for command-line access) or VNC (for graphical desktop access), depending on your preferences.
Raspberry Pi 4 Model B Components
The Raspberry Pi 4 Model B is built with several key components that contribute to its performance and versatility. Below is an overview of its main hardware elements:
BCM2711 SoC
At the core of the Raspberry Pi 4 is the Broadcom BCM2711 System on Chip (SoC). This chip features a 64-bit quad-core ARM Cortex-A72 processor, offering a significant performance boost over previous models. It powers all computing operations and supports enhanced multimedia, networking, and general processing capabilities.
LPDDR4 RAM
The board uses LPDDR4 (Low-Power Double Data Rate 4) RAM, which is the same memory technology found in smartphones and tablets. LPDDR4 delivers higher bandwidth and improved energy efficiency compared to older RAM types, making it well-suited for power-sensitive applications like portable projects and embedded systems.
MXL7704 – Power Management IC
The MXL7704 is a Power Management Integrated Circuit (PMIC) that supplies all necessary voltage rails for the board. It simplifies the board’s power architecture and reduces overall design complexity. This chip ensures stable and efficient power distribution to the Raspberry Pi’s various components.
BCM54213PE – Gigabit Ethernet Transceiver
The BCM54213PE is a dedicated Gigabit Ethernet transceiver, responsible for managing physical Ethernet communication. Unlike previous models that shared USB and Ethernet resources, the Pi 4 uses this chip to enable true Gigabit Ethernet performance, supporting standards such as 1000BASE-T, 100BASE-TX, and 10BASE-T over Cat 5 or better cables.
VL805 – USB 3.0 Controller
The VL805 is a USB 3.0 host controller that enables the Raspberry Pi 4 to support SuperSpeed USB (up to 5 Gbps). It manages the board’s two USB 3.0 ports and two USB 2.0 ports, providing fast and reliable communication with external devices like storage drives, peripherals, and more.
CSI (Camera Serial Interface) Port
The CSI port is a dedicated high-speed connector designed to interface with camera modules. Using the MIPI CSI-2 standard, this interface supports high-resolution image and video transmission with low latency and power consumption. It's ideal for projects involving computer vision, surveillance, or media streaming.
DSI Port
The 15-pin MIPI DSI (Display Serial Interface) port on the Raspberry Pi 4 Model B is used to connect compatible display modules. It supports high-speed, low-power data transmission between the Pi and an attached display via a 15-pin ribbon cable. This interface is commonly used for connecting touchscreen displays and other embedded system screens that require efficient video communication.
Dual Micro-HDMI Ports
The Raspberry Pi 4 Model B features dual micro-HDMI ports, each capable of supporting up to 4K resolution at 60 frames per second (4Kp60). This allows users to connect two independent displays for dual-screen setups. You can use micro-HDMI to HDMI cables or micro-HDMI adapters to connect standard HDMI monitors. In addition, the Pi 4 also supports a third display through the MIPI DSI port, enabling triple-display configurations for advanced applications.
Dual-Band Wi-Fi
Equipped with 802.11ac dual-band wireless LAN, the Raspberry Pi 4 supports both 2.4 GHz and 5 GHz Wi-Fi bands. This enables faster and more reliable wireless connectivity with reduced interference, a significant upgrade over earlier models that only supported 2.4 GHz.
Ethernet Controller
The onboard Ethernet controller enables the Raspberry Pi 4 to connect to wired networks via a physical Ethernet cable. It acts as a bridge between the Raspberry Pi’s processor and the Ethernet hardware, handling essential network functions like:
- Data packet transmission and reception
- Address resolution and management
- Error detection and correction
This component allows the Raspberry Pi to communicate efficiently over local and internet networks, supporting up to Gigabit Ethernet speeds.
Interfacing Raspberry Pi 4 Model B with an Ultrasonic Sensor
The Raspberry Pi 4 can be easily interfaced with an ultrasonic sensor to measure distance, typically using Python programming. Ultrasonic sensors are commonly used in:
- Obstacle avoidance robots
- Distance measurement tools
- DIY radar systems
These sensors work by sending out ultrasonic waves and calculating the time it takes for the echo to return after bouncing off an object. The Pi reads this data via its GPIO pins to determine the distance.
Components & Connections: Raspberry Pi 4 with Ultrasonic Sensor
To interface an ultrasonic sensor with the Raspberry Pi 4 Model B, you’ll need the following components:
Required Components
- Raspberry Pi 4 Model B
- HC-SR04 Ultrasonic Sensor (or similar)
- Voltage level converter (recommended to protect GPIO from 5V signals)
- 5V / 3A Power Adapter for Raspberry Pi
Wiring Connections
| Ultrasonic Sensor Pin | Raspberry Pi 4 GPIO Pin | Function |
|---|---|---|
| VCC | 5V Power Pin | Powers the sensor |
| Trig | GPIO14 (TXD) | Trigger pin for sending ultrasonic pulse |
| Echo | GPIO18 (PCM_CLK) | Receives reflected pulse (connect via level shifter) |
| GND | GND Pin | Ground connection |
The Echo pin outputs 5V, which exceeds the Pi’s 3.3V GPIO limit. To protect your board, use a voltage divider or logic level converter to drop the voltage to a safe level before connecting it to the Pi.
Code
The required Python code for the ultrasonic sensor is given below.
import RPi.GPIO as GPIO Import Raspberry Pi GPIO library to control pins
import time Import time library for delays
Use Broadcom (BCM) GPIO pin numbering
GPIO.setmode(GPIO.BCM)
Define GPIO pins connected to the ultrasonic sensor
GPIO_TRIG = 11 # Trigger pin
GPIO_ECHO = 18 # Echo pin
Set up the GPIO pins
GPIO.setup(GPIO_TRIG, GPIO.OUT) # Trigger pin as output
GPIO.setup(GPIO_ECHO, GPIO.IN) # Echo pin as input
Ensure trigger is low initially
GPIO.output(GPIO_TRIG, GPIO.LOW)
time.sleep(2) # Wait for sensor to settle
Send a 10 microsecond pulse to trigger the sensor
GPIO.output(GPIO_TRIG, GPIO.HIGH)
time.sleep(0.00001) # 10 microseconds
GPIO.output(GPIO_TRIG, GPIO.LOW)
Wait for echo start
while GPIO.input(GPIO_ECHO) == 0:
start_time = time.time()
Wait for echo end
while GPIO.input(GPIO_ECHO) == 1:
bounce_back_time = time.time()
Calculate pulse duration
pulse_duration = bounce_back_time - start_time
Calculate distance in cm
distance = round(pulse_duration * 17150, 2) # Speed of sound constant
print(f"Distance: {distance} cm")
Clean up GPIO settings
GPIO.cleanup()
Notes:
Fixed incorrect capitalization of time.sleep (it was Time.sleep).
Corrected the subtraction operator (it was a dash ‘–’, replaced with minus sign -).
Added comments for clarity.
The code runs a single distance measurement. For continuous measurement, you can wrap the pulse trigger and reading logic inside a loop.
How the Ultrasonic Sensor Works
The ultrasonic sensor operates similarly to radar technology. In radar, a transmitter emits radio waves—electromagnetic signals—that travel through the air and bounce back when they hit an object. The sensor measures the time taken for the signal to return and calculates the distance using the formula:Distance=Time×Speed of Sound\text{Distance} = \text{Time} \times \text{Speed of Sound}Distance=Time×Speed of Sound
In the ultrasonic sensor, the transmitter sends out ultrasonic sound waves (not infrared). When these sound waves reflect off an object, the receiver detects the echo. The Raspberry Pi measures the time between sending and receiving the signal to determine how far away the object is.
Raspberry Pi 4 Model B vs Raspberry Pi 5 (4GB)
Here is a comparison highlighting the key differences between the Raspberry Pi 4 Model B and the Raspberry Pi 5 (4GB):
| Feature | Raspberry Pi 4 Model B | Raspberry Pi 5 (4GB) |
|---|---|---|
| Processor | Broadcom BCM2711 with 4x Cortex-A72 cores @ 1.8 GHz; VideoCore VI GPU @ 500 MHz | Broadcom BCM2712 with 4x Cortex-A76 cores @ 2.4 GHz; VideoCore VII GPU @ 800 MHz |
| Display Output | Dual micro-HDMI supporting up to 4K 60Hz or two 4K 30Hz displays | Dual micro-HDMI supporting two 4K 60Hz displays |
| RAM | 4GB LPDDR4 | Faster 4GB and 8GB LPDDR4X options with 3631 MiB/sec transfer rate |
| I/O and Data Transfer | Main processor handles I/O; USB 3.0 slower speeds; single CSI & DSI ports | Dedicated RP1 I/O controller chip improves Ethernet & USB speeds |
| Additional Features | No power button, RTC, or active cooling | Includes power button, RTC module, and optional active cooling for thermal management |
| Storage Interface | MicroSD card slot with up to 52 Mbps | MicroSD card slot with up to 104 Mbps |
| Power Supply | 5V / 3A minimum via USB-C | 5V / 5A via USB-C for higher power delivery |
Advantages and Disadvantages
Advantages of Raspberry Pi 4 Model B
- Offers significantly increased processing power, enabling smoother multitasking and faster execution of demanding tasks.
- Features dual-band Wi-Fi (2.4 GHz and 5 GHz) and Gigabit Ethernet for more reliable and faster network connectivity.
- Available in multiple RAM options to suit different needs.
- Supports dual micro-HDMI ports, allowing connection to two 4K monitors simultaneously.
- Enhanced multimedia capabilities, including 4K video playback, making it ideal for home theater and media center setups.
- Upgraded GPU improves graphics performance.
- Relatively low power consumption compared to performance level.
- Versatile and widely used across a broad range of applications—from education to embedded projects.
Disadvantages of Raspberry Pi 4 Model B
- Lacks built-in storage; requires a microSD card for the operating system and file storage.
- Does not have a dedicated GPU, which limits performance for graphically intensive applications.
- Can experience overheating under heavy or prolonged workloads without proper cooling.
- Processing power, while improved, remains limited compared to full desktop computers.
- Overall system performance can be bottlenecked by the speed of the microSD card used.
- Requires a USB-C power adapter capable of delivering at least 5V/3A for stable operation.
Applications of Raspberry Pi 4 Model B
The Raspberry Pi 4 Model B is incredibly versatile and finds use in a wide variety of projects and fields, including:
- Home Automation: Control lights, appliances, and security systems using IoT platforms and protocols.
- Media Centers: Stream movies, TV shows, and music with popular software like Kodi or Plex.
- Retro Gaming: Run RetroPie and other emulators to enjoy classic video games.
- File Storage & Hosting: Use it as a reliable file server or host small websites.
- Desktop Computing: Perform everyday tasks such as word processing and web browsing.
- Education & Development: Teach and learn programming, electronics, and computer science concepts.
- Robotics: Control robots for hobbyist or educational purposes.
- Software & Hardware Experimentation: Test and prototype new ideas on an affordable, flexible platform.
As a significant upgrade over earlier Raspberry Pi models, the Pi 4 offers enhanced processing power, memory, connectivity, and multimedia capabilities. Its desktop-level performance supports everything from simple DIY projects to complex automation and development solutions.
Related Articles
How Do Distance Sensors Work and Where Are They Used?
Throttle Position Sensors: How They Work and Where They're Used
How Inductive Sensors Work and Where They're Used
How a Flame Sensor Works and Where It's Used
How a Flex Sensor Works and Where It's Used
How Touch Sensors Work and Where They're Used
Soil Moisture Sensors: How They Work and Where They're Used
2SA1015 Transistor: Pinout, Features, and Common Uses
Popular 555 Timer Circuit Ideas for Engineering Projects
Subscribe to JMBom Electronics !


