


Preamplifiers: What They Are, How They Work, Types and Differences
Catalog
What Is a Preamplifier?How a Preamplifier WorksBasic Preamplifier CircuitHow the Preamplifier Circuit WorksTypes of PreamplifiersHow to Use a Preamplifier with a Power AmplifierDifference Between Preamplifier and AmplifierHow to Choose the Right PreamplifierAdvantages & DisadvantagesApplications of PreamplifiersFrequently Ask QuestionsRelated ArticlesPreamplifiers—often called preamps—were first developed in the early 1900s as essential parts of radio and phonograph systems. Over time, they evolved into transistor-based models and later into digital preamps, which offer improved reliability, reduced cost, and lower noise levels.
Modern preamps include advanced features like signal balancing, filtering, surround sound support, equalization, wireless connectivity, and room correction. They play a critical role in any audio setup by boosting weak audio signals before they reach the power amplifier and speakers. Preamps also help manage signal levels and routing based on different needs.
In this article, we'll take a closer look at what a preamplifier does, how it works, the different types available, how they compare, and tips on how to choose the right one for your system.
Preamplifiers
What Is a Preamplifier?
A preamplifier, or preamp, is an electronic device that amplifies weak audio signals—such as those from microphones or instruments—without significantly affecting the original signal-to-noise (S/N) ratio. In simpler terms, it boosts low-level signals to a level suitable for further amplification, while keeping noise to a minimum.
Preamplifiers often come with key features like tone control, digital input support, and balance adjustment, making them versatile tools in audio setups.
They are essential components in both home theater and stereo systems. Their main role is to take the signal from an audio source—like a CD player, turntable, or media streamer—and amplify it enough for a power amplifier to drive the speakers. In addition to boosting the signal, preamps also handle audio processing tasks such as tone shaping, volume control, and channel balance.
How a Preamplifier Works
A preamplifier—or preamp—boosts a weak electrical signal into a stronger one that is more resistant to noise and suitable for processing by a power amplifier and, ultimately, playback through speakers. Without a preamp, the signal would be too weak and could become distorted or noisy by the time it reaches the output stage.
Preamps are commonly used in home audio systems and home theater setups. Choosing the right preamplifier depends on several factors, including the number of input channels you need, the desired audio features, and the level of sound quality you’re aiming for.
Basic Preamplifier Circuit
Below is a simple preamplifier circuit that uses a single NPN transistor. This basic design can provide a voltage gain ranging from 3 to 30, depending on the source and load impedance. Note that this circuit has a low input impedance, making it more suitable for certain signal sources.
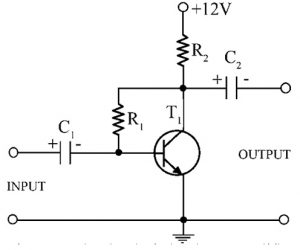
Preamplifier Circuit
Components Used:
- Resistors: R1 = 2.2 MΩ R2 = 4.7 KΩ
- Capacitors: C1 = 10 µF, 10V (electrolytic) C2 = 10 µF, 10V (electrolytic)
- Transistor: T1 = BC148B (NPN transistor)
To build the circuit, connect the components as shown in the schematic below.
How the Preamplifier Circuit Works
This basic preamplifier circuit uses a single low-power transistor configured in common emitter (CE) mode. When an input signal is applied to the base of the transistor T1 through the C1 coupling capacitor, the capacitor transfers the AC input signal to the base-emitter (BE) junction of the transistor.
A 12V Vcc supply is connected to the collector of the transistor, which also helps provide base current indirectly. Under zero-signal conditions, capacitor C1 acts as an open circuit because its reactance is extremely high at DC (zero frequency). Therefore, C1 serves as a blocking capacitor, allowing only AC signals to pass while blocking any DC component from the input.
Similarly, C2 acts as a coupling capacitor, allowing the amplified AC signal to pass from the transistor’s output to the next stage while preventing DC from flowing forward.
This circuit uses a fixed-bias configuration, where resistor R1 is used to set the biasing of the transistor. Proper biasing ensures that the transistor operates in the active region for linear amplification.
Types of Preamplifiers
Preamplifiers can be categorized into the following main types based on their sensitivity and application:
- Current-Sensitive Preamplifier Designed to amplify small current signals, often used in applications like photodetectors or current-output sensors.
- Parasitic-Capacitance Preamplifier Used when parasitic capacitance needs to be minimized or compensated—especially in high-frequency or sensitive measurement environments.
- Charge-Sensitive Preamplifier Converts small charges into voltage signals, widely used in radiation detection and particle physics experiments where signals are extremely weak.
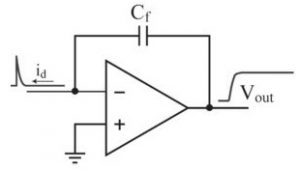
Current-Sensitive Preamplifier
A current-sensitive preamplifier with a 50Ω input impedance is designed to properly terminate a 50Ω coaxial cable and convert a current pulse from a detector into a corresponding voltage pulse.
If the rise time of the preamplifier is much shorter than the rise time of the detector, the preamplifier’s voltage gain is denoted by A, and the output voltage (Vout) can be calculated using the formula:Vout=50×Iin×AV_{\text{out}} = 50 \times I_{\text{in}} \times AVout=50×Iin×A
Where:
- IinI_{\text{in}}Iin is the amplitude of the input current pulse from the detector
- A is the voltage gain of the preamplifier
- 50 represents the matching input impedance in ohms
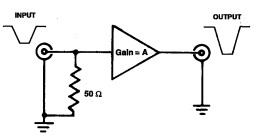
Current Sensitive Type
This voltage signal is then typically fed into a fast discriminator, which processes the signal for counting applications. The output from the discriminator is recorded using a counter or timer, making this setup ideal for high-speed pulse detection systems.
Timing Limitations and the Role of Current-Sensitive Preamplifiers
In timing applications using photomultiplier tubes (PMTs) and microchannel plates (MCPs), one of the main limitations in achieving high timing resolution is the variation in electron transit times as they cascade through the detector. This variation leads to timing jitter—uncertainty in the pulse arrival time at the detector output.
When the detector signal levels are high enough to require a current-sensitive preamplifier, it's important to also consider the input noise of the preamplifier, as it can further degrade the timing resolution. To address this, current-sensitive preamplifiers designed specifically for timing applications typically feature AC coupling with time constants in the range of a few hundred nanoseconds. These time constants are optimized to balance signal fidelity and noise suppression, making them suitable for fast pulse processing.
Parasitic-Capacitance Preamplifier
A parasitic-capacitance preamplifier is characterized by a high input impedance, typically around 5 MΩ. It is designed to operate in systems where the detector generates a current pulse that flows into the combined parasitic capacitance present at the interface between the detector output and the preamplifier input.
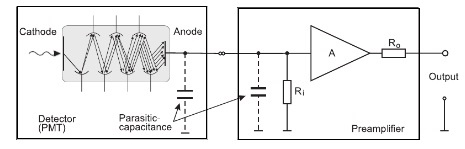
Parasitic-capacitance Preamplifier
This combined parasitic capacitance usually falls in the range of 10 to 50 picofarads (pF). The resulting signal is a voltage pulse whose amplitude is proportional to the total charge of the detector pulse. The rise time of this voltage pulse closely matches the duration of the detector’s current signal.
This type of preamplifier is ideal in situations where minimizing loading on the detector is critical and where preserving the integrity of the charge information is more important than high-speed timing performance.
Additional Considerations for Parasitic-Capacitance Preamplifiers
In this type of preamplifier, the input capacitance is connected in parallel with a resistor, which causes the output signal to decay exponentially with a time constant of approximately 50 microseconds.
To drive the low impedance of a coaxial cable, a unity-gain buffer amplifier with high input impedance is used. A 93-ohm resistor is placed in series with the output to match the characteristic impedance of the cable, which helps absorb signal reflections, especially in long cable runs.
However, these preamplifiers are not suitable for semiconductor detectors, as their gain is highly sensitive to even small changes in parasitic capacitance. In partially depleted semiconductor detectors, the detector’s capacitance varies depending on the bias voltage applied to the diode. Even slight movement in the interconnecting cables can alter the input capacitance by a few tenths of a picofarad, leading to gain instability.
Charge-Sensitive Preamplifier
A charge-sensitive preamplifier is widely used in readout circuitry for pulse-based detectors, especially in fields such as nuclear and radiation detection. This type of preamplifier integrates the input current pulse and produces an output voltage proportional to the total charge delivered by the detector during the pulse event.
Compared to other preamplifier types, charge-sensitive designs offer stable gain that is independent of input capacitance and amplifier bandwidth. This makes them ideal for applications requiring high-precision signal measurement, such as counting and energy spectroscopy in particle physics or medical imaging.
While they are primarily used in scientific and industrial settings, charge-sensitive preamplifiers can also be adapted for home audio systems. When integrated with other audio equipment, they are capable of producing natural sound at a low cost, offering a balance of performance and affordability.
Charge-sensitive Type
How to Use a Preamplifier with a Power Amplifier
In a typical audio system, a preamplifier is placed before the power amplifier in the signal chain. This setup is essential because microphones, analog audio sensors, and other signal sources produce very weak and noise-prone signals that are not strong enough to be fed directly into a power amplifier.
A power amplifier is designed to boost signals to levels capable of driving speakers, but it does not filter out noise or interference. Feeding it a raw, low-level signal from a microphone or sensor can result in distorted or noisy output.
That’s where the preamplifier comes in—it:
- Boosts the weak signal to a suitable level for the power amplifier
- Cleans up the signal by minimizing noise and interference
- Balances gain levels to ensure consistent and clear output
Without a preamp, a power amplifier alone cannot handle low-level inputs properly. The result would be poor audio performance, with distortion, noise, and inadequate volume. By placing a preamplifier between the source and the amplifier, you ensure the signal is clean, strong, and properly conditioned for high-quality amplification.
Difference Between Preamplifier and Amplifier
| Feature | Preamplifier (Preamp) | Amplifier (Power Amp) |
|---|---|---|
| Function | Boosts weak audio signals to line level for further amplification or processing. | Increases line-level signals to drive speakers or headphones. |
| Also Known As | Preamp | Amp |
| Common Applications | Found in integrated amplifiers, AV receivers, audio interfaces. | Used in TV/radio transmitters and receivers, musical instruments, hi-fi systems, etc. |
| Cost | Generally low cost | Varies from low to moderate, depending on power and features |
| Inputs/Outputs | Multiple inputs, typically one output | Usually one input, multiple outputs |
| Gain Setting | Fixed gain | Gain may be fixed or variable |
| Input Impedance | Typically fixed | Can be fixed or adjustable |
| Tone Controls | Usually does not include tone controls | Often includes tone controls like bass, treble, and EQ |
| Audio Channels | Typically supports 2 channels (stereo) | Can support multiple channels (up to 7 or more for surround sound systems) |
How to Choose the Right Preamplifier
A preamplifier plays a crucial role in shaping the quality and character of your recordings by boosting low-level signals—such as those from microphones—before they reach your audio interface or mixer. Choosing the right preamp for your setup involves balancing sound quality, technical specs, and personal workflow preferences. Here are the key factors to consider:
1. Gain & Headroom
- Gain refers to how much the preamp amplifies the input signal.
- Headroom is the maximum level the preamp can handle without distortion.
For most recording applications, you’ll want a preamp that offers at least 60 dB of gain and 20 dB of headroom to ensure clean, distortion-free signals—even from low-output microphones.
2. Color & Tone
Some preamps add a distinct "character" to the sound, described in terms like warmth, clarity, saturation, or brightness. This tonal coloration may be subtle or pronounced, depending on the circuitry.
- Transparent preamps preserve the original sound faithfully.
- Colored preamps enhance it with a unique sonic flavor.
Choose based on your musical style and personal preference. For example, jazz vocals might benefit from warmth, while electronic music may call for clarity.
3. Features & Functions
Modern preamps often include additional controls to help shape the input signal before it's recorded. Common features include:
- Phantom power (for condenser microphones)
- Polarity (phase) switch
- Low-cut (high-pass) filter
- Pad switch (to reduce input level)
- Metering and signal indicators
Consider which features best support your recording workflow and environment.
4. Compatibility & Connectivity
Ensure the preamp integrates well with your current gear:
- Check for compatible input/output connectors, such as XLR, TRS, or RCA.
- Confirm it works seamlessly with your audio interface, mixer, and digital audio workstation (DAW).
- Also verify operating system compatibility if it includes USB or digital features.
5. Build Quality & Budget
Your choice will ultimately depend on how much you're willing to invest and what level of performance you expect. Consider:
- User reviews and professional ratings
- Brand reputation and product warranty
- Support availability
You don't always need to buy the most expensive model—but look for a preamp that delivers reliable, consistent performance in your price range.
Tip: If possible, test different preamps with your own microphone and voice to hear the tonal differences before making a final decision.
Advantages & Disadvantages
Advantages of Preamplifiers
- Boost weak signals from source devices to levels suitable for power amplifiers.
- Allow easy switching between multiple source components.
- Deliver higher sound quality with less noise and greater gain.
- Offer wider bandwidth and high dynamic range.
- Generally affordable and cost-effective.
- Simple to install and troubleshoot.
- Readily available and highly responsive.
- Operate linearly for accurate signal amplification.
- Feature high input impedance and low output impedance for proper signal matching.
- Commonly designed to be charge-sensitive or current-sensitive, enhancing signal fidelity.
- Impart a distinct sonic character or “attitude” to your audio.
- Quickly convert low-voltage audio signals for further processing.
Disadvantages of Preamplifiers
- Usually have a limited number of inputs and outputs.
- Tend to be heavier compared to some other audio components.
- Often lack extensive control options beyond basic gain and tone adjustments.
- Can be a critical, sensitive component in specialized electronics (e.g., gyroscopes), requiring careful handling.
Applications of Preamplifiers
- Amplify very low-amplitude acoustic emission (AE) signals from sensors into usable, stronger signals.
- Essential in any system where input signals are too weak for direct power amplifier processing.
- Commonly used as the first amplification stage to prepare signals for further processing or power amplification.
- Widely used in communication systems to boost faint signals received by antennas, often placed close to the antenna for minimal loss.
- Convert low-voltage, high-impedance signals into high-voltage, low-impedance signals, reducing susceptibility to signal degradation.
- Improve signal-to-noise ratio (SNR) before transmission through cables to power amplifiers.
- Support high-fidelity audio systems by managing stereo channels and input switching.
- Provide RIAA equalization for recording and playback of phonograph records.
- Manage multiple audio channels in home theater setups.
- Prepare input audio signals for amplification in virtually any audio system.
- Integrated into sound cards, equalizers, DJ mixers, and similar audio equipment.
- Enhance outputs of analog sensors and transducers like proximity sensors and microphones.
- Used at the receiver end of communication systems to reduce noise and interference, improving signal clarity.
In summary, this overview covered the basics of preamplifiers—their working principles, types, circuits, and common applications. Preamplifiers are essential components in high-quality audio systems, responsible for boosting and refining signals from source devices to ensure clean, powerful sound. When choosing a preamp, it’s important to consider factors like compatibility with your existing gear and the sound characteristics you prefer. Understanding the function and variety of preamplifiers can greatly enhance your overall audio experience.
Now, here’s a question for you: What is an amplifier?
Frequently Ask Questions
What Is a Preamplifier Used For?
A preamplifier’s main job is to boost weak signals from a detector or audio source without adding much noise. It’s usually placed close to the signal source, and its input circuits are matched to the detector’s characteristics to preserve sound quality.
Why Would You Need a Preamp?
If you use low-output microphones—like ribbon mics—an external preamp can significantly improve sound quality. For high-output condenser microphones, the difference may be less noticeable.
What’s the Difference Between an Amplifier and a Preamplifier?
The preamplifier raises weak signals to line level, controls volume and gain, and acts as a central control for your audio system. The amplifier then takes that line-level signal and powers your headphones or speakers.
Does a Preamp Improve Sound Quality?
Yes, especially for sources like turntables. An external preamp can enhance sound quality, but the overall impact depends on your complete audio setup and component quality.
What Is the Primary Purpose of a Preamplifier?
To amplify weak signals from detectors or sources while maintaining the original signal-to-noise ratio, ensuring a clean signal for further processing.
When Should I Use a Preamp?
You need a preamp whenever you work with low-level audio signals—such as recording, broadcasting, or live sound—to make those signals loud enough to be usable.
How Do I Know If I Need a Preamp?
Try connecting your turntable (or other source) directly to your recording device. If the recorded sound is too quiet, you’ll need a preamp to boost the signal.
What Happens If I Don’t Use a Preamp?
Without a preamp, signals like those from a turntable will be too weak, resulting in very low volume and poor sound quality.
What Is a Preamplifier (For Beginners)?
A preamp is a device that takes a very quiet input signal and makes it much louder. Traditionally, preamps were separate hardware units placed between the audio source and recording or mixing equipment.
How Do I Choose a Preamplifier?
Look for a preamp that performs well on the basics, includes any features you actually need, and avoids unnecessary extras that could complicate setup or degrade sound quality.
Related Articles
Passive High-Pass Filter: Overview, Circuit Design & Transfer Function
Differential Pressure Sensors: Working Principle, Interfacing,Testing Methods and Common Issues
Voltage Amplifier: Circuit Design, Gain, vs. Power Amplifier, and Key Applications
Resistor-Transistor Logic (RTL):Operation, Features, and Applications
Diode-Transistor Logic (DTL): Circuit Design,Truth Table, and Applications
2N5089 NPN Transistor: Overview, Pinout, and Common Uses
ESP32-S2 Development Board: Pinout, Features & Specs
ADXL335 Accelerometer Module: Pin Configuration, Features & Internal Components

Amanda Miller
Amanda Miller is a senior electronics engineer with 6 years of experience. She focuses on studying resistors, transistors, and package design in detail. Her deep knowledge helps her bring innovation and high standards to the electronics industry.
Subscribe to JMBom Electronics !


