


Capacitive Sensors : How They Work and Where They’re Used
Catalog
What Is a Capacitive Sensor?What Can a Capacitive Sensor Detect?How Does a Capacitive Sensor Work?Capacitive Sensor Block DiagramCapacitive Sensor FormulaTypes of Capacitive SensorsMains-Operated Capacitive Sensor CircuitUsing the Circuit as a Door Alarm or Touch SensorCapacitive Sensor vs. Inductive SensorCapacitive Sensor Interfacing with ArduinoUsing the MPR121 Capacitive Touch Sensor with ArduinoPin Configuration of the MPR121 Capacitive Touch SensorCharacteristics of Capacitive SensorsAdvantages and Disadvantages Applications of Capacitive SensorsIn SummaryRelated ArticlesCapacitive sensors have been commercially available for many years and are commonly used to detect non-metallic objects. While they typically operate over short distances—usually less than 1 cm—they are highly effective for specific applications. In general, a capacitive sensor is a type of proximity sensor that detects nearby objects by sensing changes in an electric field generated by the sensor itself. These sensors function somewhat like radar in that they can sense conductive objects even through insulating materials such as plastic or wood.
However, capacitive sensors differ from radar in several key ways. They are smaller in size, easier to implement, more cost-effective, and consume less power. This article provides an overview of what capacitive sensors are, how they function, and some common applications where they are used.
What Is a Capacitive Sensor?
A capacitive sensor is an electronic sensing device designed to detect both solid and liquid targets without requiring direct contact. It operates by generating an electric field from its sensing surface. When a target enters this field and causes a measurable change—such as a shift in capacitance—the sensor registers the presence of the object. This ability to detect materials through contactless sensing makes capacitive sensors ideal for a wide range of industrial and consumer applications.
What Can a Capacitive Sensor Detect?
Capacitive sensors are capable of detecting a variety of solid and liquid materials. Solid materials include paper, plastic, glass, fabric, and wood. In terms of liquids, these sensors can identify substances such as water, oil, paint, and more.
How Does a Capacitive Sensor Work?
The operating principle of a capacitive sensor is similar to that of a standard capacitor. Inside the sensor, a metal plate located at the sensing surface is connected to an oscillator circuit. When a target object comes close, it acts as the second plate of the capacitor. Unlike inductive sensors, which produce an electromagnetic field, capacitive sensors create an electrostatic field to detect objects.
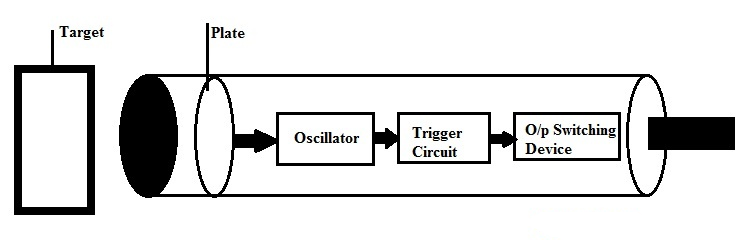
Capacitive Sensor Block Diagram
The basic block diagram of a capacitive sensor is shown below. Internally, the sensor consists of a high-frequency oscillator connected to a sensing surface made up of two metal electrodes. When an object comes near this sensing surface, it enters the electrostatic field generated by the electrodes. This interaction causes a change in capacitance, which is detected by the oscillator circuit.
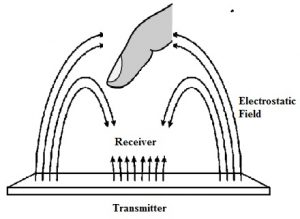
Electrostatic Field Generation
As the target approaches, the oscillator circuit begins to oscillate and changes the sensor’s output state once a specific amplitude threshold is reached. When the target moves away, the oscillator’s amplitude decreases, returning the sensor to its original output condition.
Typically, capacitive sensors have a sensing range of about 1 inch (25 mm), although certain models can extend this range up to 2 inches (approximately 50 mm).
Capacitive Sensor Working
Capacitive sensors work effectively by detecting an object’s dielectric constant. This feature allows them to sense materials even inside non-metallic containers. Since most liquids have a much higher dielectric constant than the container material (such as plastic or glass), the sensor can detect the liquid through the container walls. For accurate and reliable performance, these sensors should be used in environments with relatively stable temperature and humidity.
Capacitive Sensor Formula
A capacitive sensor operates based on the principle of capacitive coupling and is widely used for various types of sensing applications. These sensors can detect and measure parameters such as motion, displacement, chemical composition, and electric fields. They can also indirectly measure other variables—like acceleration, pressure, fluid composition, and fluid level—by detecting changes in dielectric constant or position.
A typical capacitive sensor consists of two conductive plates separated by a distance d, with each plate having an area A. The capacitance C between the plates is calculated using the following formula:C=ε⋅AdC = \frac{\varepsilon \cdot A}{d}C=dε⋅A
Where:
- C = Capacitance (in Farads)
- ε = Permittivity of the dielectric material between the plates
- A = Area of the plates
- d = Distance between the plates
Types of Capacitive Sensors
Capacitive sensors provide non-contact detection of various targets. Beyond simply detecting the presence or absence of an object, they can also sense parameters like pressure, flow rate, distance, liquid level, and more. This versatility makes them suitable for a wide range of materials and applications across different industries.
Capacitive sensors come in several types, including the following:
1. Miniature Capacitive Sensors
Miniature capacitive sensors are available in compact forms such as wafer-thin or cylindrical shapes, allowing them to fit into very tight spaces. These sensors are commonly used for monitoring and controlling machine operations, and they often function as counters for job or part detection. Due to their small size, these sensors typically require an external amplifier. The amplifier is usually equipped with a potentiometer, which allows for easy sensitivity adjustment to match the application requirements.

Miniature Sensor
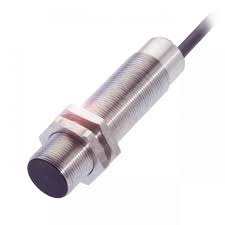
2. Cylindrical Capacitive Sensors
Cylindrical capacitive sensors are larger than miniature types, typically ranging in diameter from ∅6.5 mm to M12 and M12 to M30. These sensors offer adjustable sensing distances, a variety of housing diameters, and both flush and non-flush mounting configurations. They are commonly used for level detection and contactless proximity sensing—either directly or through the walls of non-metallic containers.
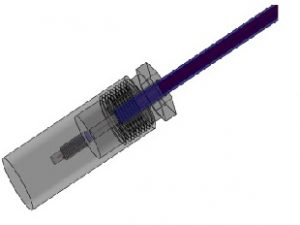
Cylindrical Capacitor Sensor
3. High-Temperature Capacitive Sensors
High-temperature capacitive sensors are specifically designed for environments where the sensing element is exposed to elevated temperatures. These sensors remain functional even when in direct contact with hot materials and are ideal for detecting liquid levels or bulk materials in harsh industrial conditions.

High Temperature Sensor
4. Analog Capacitive Sensors
Analog capacitive sensors function similarly to standard capacitive sensors but offer enhanced capabilities depending on the application. They are particularly well-suited for tasks such as material selection, thickness measurement, and monitoring changes in concentration. Their ability to provide continuous output makes them ideal for more precise control and monitoring applications.
Analog Capacitive Sensor
Mains-Operated Capacitive Sensor Circuit
The diagram below shows a mains-powered capacitive sensor circuit. This setup uses components such as a capacitive sensor, resistors (R1 = 220K, R2 = 47K, R3 = 1K), an SCR (D1 = TIC106M, 600V, 5A), a small neon indicator lamp (LP1), a 230V mains lamp (LP2), and optionally, a 230V buzzer (BZ1) and a single-pole single-throw switch (SPST SW1). PL1 refers to the mains plug and power cable.
This circuit functions as a high-sensitivity capacitive touch sensor. When part of the human body comes close to the sensor, the buzzer and/or lamp can be activated—operating at approximately half the mains voltage. This design can serve as a simple alternative to traditional door alarm systems or other basic capacitive detection circuits.
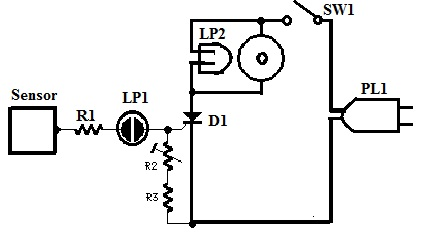
Capacitive Sensor Operated through Mains
Using the Circuit as a Door Alarm or Touch Sensor
When this circuit is used as a door alarm, the buzzer or lamp is triggered as soon as someone touches the exterior door handle. Since the alarm is not self-latching, it automatically turns off once the hand is removed from the handle.
The wide-range sensitivity adjustment provided by resistor R2 allows the circuit to be adapted for different types of doors, handles, and locks. The circuit has proven reliable, even when part of the lock is in contact with a nearby wall. However, it may not operate correctly with all-metal doors due to their shielding effect.
This circuit can also function as a basic touch-activated switch. In this mode, simply touching the left-side terminal of R1 will activate the load, making it possible to use the circuit without a dedicated sensor plate. For extended range sensing, a thin aluminum or copper sheet measuring approximately 30 × 20 cm can be used as a sensor plate—allowing detection of a human body from up to 20 cm away.
The circuit is designed to operate on 230V AC. If you need to use it with 110–120V AC, change R1 to 100K. If the circuit does not operate as expected, try reversing the mains plug in the socket, as the neutral wire must be connected to the cathode of D1 for proper functioning.
When used as a door-handle alarm, better performance can be achieved by replacing R2 with a trimmer or potentiometer in the 5K to 10K range for precise sensitivity adjustment.
Important Safety Note: The load (lamp or buzzer) operates at roughly half the mains voltage. This is typically sufficient—lamps will still provide visible light for signaling, and buzzers will sound, though with slightly reduced volume. Since the circuit connects directly to 230V AC mains, avoid contact while it’s powered. Always enclose the circuit in a well-insulated plastic case for safety.
Capacitive Sensor vs. Inductive Sensor
| Feature | Capacitive Sensor | Inductive Sensor |
|---|---|---|
| Detection Method | Uses an electric field to detect objects | Uses a magnetic field to detect objects |
| Target Requirements | Can detect both conductive and non-conductive materials | Can only detect conductive (metal) materials |
| Material Compatibility | Suitable for detecting metals, liquids, plastics, wood, paper, etc. | Suitable for detecting metal objects only |
| Operating Principle | Measures changes in capacitance | Measures changes in inductance |
| Sensor Types | Available in miniature, cylindrical, high-temperature, and analog types | Available in high-frequency oscillation, magnetic, and electrostatic types |
| Switching Frequency | Lower switching frequency | Higher switching frequency |
| Accuracy | Lower accuracy; may be prone to false triggers | High accuracy and reliable detection |
| Detection Range | Typically 2–50 mm | Typically 0.8–100 mm |
Capacitive Sensor Interfacing with Arduino
Capacitive sensors work by detecting small changes in capacitance in their surrounding environment. These changes occur when materials with some level of conductivity—such as metals or liquids—come near the sensor. Some capacitive sensors allow you to adjust their sensitivity, often using a button or a potentiometer.
These sensors are commonly used in applications like monitoring water levels in tanks, detecting leaks, sensing air bubbles in pipes, or functioning as touch switches, metal detectors, or door contact sensors.
Using the MPR121 Capacitive Touch Sensor with Arduino
The MPR121 is a high-precision capacitive touch sensor module that can easily be interfaced with an Arduino. It supports I²C communication, making it simple to connect with most microcontrollers.
- The MPR121 module offers 12 independent touch input channels, allowing for multiple touch points or controls.
- It does not include an onboard voltage regulator, so the supply voltage should be between 1.7V and 3.6V DC.
- If using with a 5V Arduino board (such as the Uno), a logic level shifter or external regulator is recommended to protect the sensor.
This setup allows users to build responsive touch-based interfaces, ideal for interactive projects, custom keypads, or proximity-triggered systems.
Pin Configuration of the MPR121 Capacitive Touch Sensor
The MPR121 capacitive touch sensor module features 6 pins on the left side for power and communication, and 12 touch input pins (0 to 11) on the right side that act as touch-sensitive electrodes.
Here’s a breakdown of the main pins:
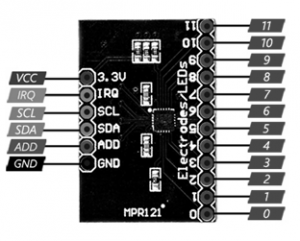
MPR121 Sensor Module
- VCC: Power supply input (typically 3.3V).
- GND: Ground connection.
- IRQ: Interrupt output pin, used to notify the microcontroller when a touch is detected.
- SCL: Serial Clock Line for I²C communication.
- SDA: Serial Data Line for I²C communication.
- ADD: I²C address selection pin (used to modify the I²C address if multiple MPR121 modules are used).
Required Components for Arduino Interfacing
To interface the MPR121 with an Arduino, you will need the following hardware and software:
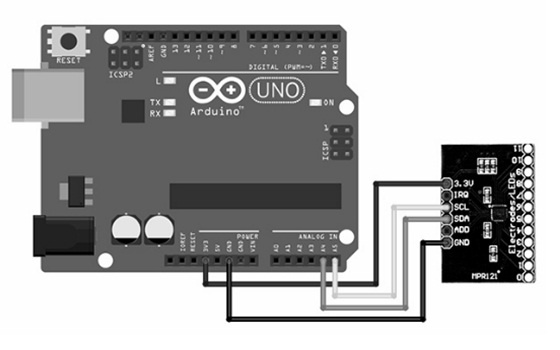
Capacitive Sensor Interfacing with Arduino
- Arduino Uno R3
- MPR121 Capacitive Touch Sensor Module
- Male-to-female jumper wires
- Arduino IDE (for uploading and testing the code)
The wiring diagram (not shown here) will illustrate how to connect each pin of the MPR121 to the Arduino Uno using jumper wires, typically using the I²C interface (SCL to A5, SDA to A4 on Uno).
Programming the MPR121 Capacitive Touch Sensor with Arduino
Once the wiring between the MPR121 and Arduino Uno is completed, follow these steps to upload and test the code:
Step 1: Install the Library
- Open the Arduino IDE.
- Go to Sketch > Include Library > Manage Libraries.
- In the Library Manager, search for "Adafruit MPR121".
- Install the Adafruit MPR121 library.
Step 2: Upload the Sample Code
cppCopyEdit/*
  Modified on Jan 20, 2021
  Modified by MehranMaleki from Arduino Examples
*/

#include <Wire.h>
#include "Adafruit_MPR121.h"

#ifndef _BV
#define _BV(bit) (1 << (bit))
#endif

// Create MPR121 object
Adafruit_MPR121 cap = Adafruit_MPR121();

// Variables to track touch state
uint16_t lasttouched = 0;
uint16_t currtouched = 0;

void setup() {
  Serial.begin(9600);
  while (!Serial) {
    delay(10); // wait for Serial Monitor to open (for Leonardo/Micro)
  }

  Serial.println("Adafruit MPR121 Capacitive Touch Sensor Test");

  // Initialize MPR121 with default I2C address 0x5A
  if (!cap.begin(0x5A)) {
    Serial.println("MPR121 not found, check wiring?");
    while (1);
  }

  Serial.println("MPR121 found!");
}

void loop() {
  // Read currently touched pads
  currtouched = cap.touched();

  for (uint8_t i = 0; i < 12; i++) {
    // If currently touched and previously not touched
    if ((currtouched & _BV(i)) && !(lasttouched & _BV(i))) {
      Serial.print("Pad ");
      Serial.print(i);
      Serial.println(" touched");
    }

    // If previously touched and currently not touched
    if (!(currtouched & _BV(i)) && (lasttouched & _BV(i))) {
      Serial.print("Pad ");
      Serial.print(i);
      Serial.println(" released");
    }
  }

  // Update the last touch state
  lasttouched = currtouched;

  delay(100); // Small delay to reduce serial spam
}
How It Works
- When you upload this code and open the Serial Monitor, the Arduino will first check whether the MPR121 module is correctly connected.
- If successful, you’ll see "MPR121 found!" in the Serial Monitor.
- Then, every time you touch or release one of the sensor's 12 pads (0 to 11), the event is printed in real-time (e.g., "Pad 3 touched" or "Pad 5 released").
Notes
- The MPR121 uses I²C communication. On an Arduino Uno, connect: SDA to A4 SCL to A5
- Ensure your power supply is between 1.7V and 3.6V, as the MPR121 is not 5V-tolerant.
- If needed, use a logic level shifter or a 3.3V regulator.
Characteristics of Capacitive Sensors
Capacitive sensors possess several key features that make them suitable for a wide range of industrial and precision applications:
- High Sensitivity to Light Objects: They can detect small or lightweight objects that traditional mechanical switches may miss.
- Fast Switching Response: With a high switching frequency, they are ideal for fast-paced operations such as object counting.
- Non-Contact Sensing Through Barriers: These sensors can detect liquids and other targets through non-metallic materials like plastic or glass.
- Long Operational Life: Being solid-state devices, they offer virtually unlimited operating cycles with no mechanical wear.
- Bounce-Free Output Signal: Their solid-state output ensures clean, noise-free signal switching.
- Standoff or Sensing Distance: Capacitive sensors generally have a larger sensing range—typically between 5 mm to 40 mm—compared to some other sensor types.
- Superior Performance Metrics: They offer a balanced combination of linearity, accuracy, stability, bandwidth, and resolution, often outperforming traditional sensors like strain gauges and LVDTs (Linear Variable Differential Transformers).
Advantages and Disadvantages
Advantages of Capacitive Sensors
- Can detect non-metallic as well as metallic objects.
- Capable of sensing through various non-metallic containers.
- Simple construction with fewer mechanical components.
- Adjustable sensitivity to suit different materials and applications.
- Suitable for detecting both solid and liquid targets.
- Cost-effective compared to other non-contact sensors.
- High sensitivity, requiring only a small amount of energy for operation.
- Useful for measuring pressure, humidity, force, and other physical variables.
- Offers excellent frequency response and resolution, often below 0.003 mm.
Disadvantages of Capacitive Sensors
- Highly sensitive to environmental changes such as humidity and temperature, which may affect accuracy and stability.
- Capacitance is more difficult to measure than resistance, requiring more complex circuitry.
- Generally less accurate than inductive sensors, especially in challenging industrial environments.
Applications of Capacitive Sensors
Capacitive sensors are highly versatile and used across a wide range of industries due to their ability to detect both conductive and non-conductive materials (excluding air). Their main applications include:
- Object Detection: Capable of sensing objects with a dielectric constant different from air, such as plastics, glass, and liquids.
- Position Sensing: Frequently used to detect changes in the position of conductive targets with high precision.
- Measurement of Material Properties: Effective in monitoring density, thickness, presence, and location of non-conductive materials.
- Level Sensing: Used to detect fluid levels in tanks or containers, even through non-metallic walls.
- Displacement and Proximity Detection: Suitable for non-contact sensing of acceleration, displacement, and proximity.
- Environmental Sensing: Capacitive sensors can be configured to monitor humidity levels based on dielectric changes in the air.
- Touch Input Devices: Widely used in capacitive touch screens found in smartphones, tablets, laptops, and digital audio players.
- Button Replacement: These sensors have replaced mechanical buttons in many consumer electronics, offering longer life and a sleeker interface.
In Summary
Capacitive sensors are commonly used for detecting positional changes in conductive targets, and they are equally effective for measuring a variety of physical parameters including density, thickness, and the position of non-conductive materials.
Related Articles
Logic Analyzers: Overview, Function, Types, Comparison & Maintenance
Passive High-Pass Filter: Overview, Circuit Design, Operation & Types
ESP32-S3 vs ESP32: What’s the Difference?
Chemical Sensors: Design, Operation, Types and Comparison with Biosensors
ESP32 vs Arduino: What’s the Difference?
Designing a Voltage Regulator Using a MOSFET
Thin Film Transistor: Structure, Working, Connection & Applications

Christopher Anderson
Christopher Anderson has a Ph.D. in electrical engineering, focusing on power electronics. He’s been a Senior member of the IEEE Power Electronics Society since 2021. Right now, he works with the KPR Institute of Engineering and Technology in the U.S. He also writes detailed, top-notch articles about power electronics for business-to-business electronics platforms.
Subscribe to JMBom Electronics !


