


How to Test a Capacitor
Catalog
Why Is It Important to Test Capacitors?How to Safely Discharge a CapacitorStep-by-Step Guide to Discharging a Capacitor SafelyTools and Safety Gear You'll NeedSafety Tips to Keep in MindMethods for Testing a CapacitorComparison of Capacitor Testing MethodsHow to Choose the Right Method for Testing Your CapacitorTroubleshooting Tips for Capacitor TestingCommon Capacitor Testing Issues and How to Fix ThemCapacitor Maintenance and HandlingEnsure Capacitor Efficiency and Reliability with Expert TestingRelated ArticlesLooking for a quick and simple way to test capacitors without wasting time?
As an engineer, you’ve likely dealt with the hassle of tracking down faulty components. You need accurate readings, but choosing the right tools and methods can be overwhelming.
Capacitors play a key role in electronic circuits, so making sure they’re working properly is essential. Unfortunately, testing them can often feel complicated and unreliable.
This guide breaks down the capacitor testing process into easy, clear steps. You’ll learn how to tell if a capacitor is still good or needs to be replaced—without the confusion.
Whether you're using a basic multimeter or a high-end LCR meter, this guide gives you the practical know-how to test capacitors quickly and confidently. No more guessing—just clear, accurate results.
Let’s get started and make your troubleshooting faster and easier.
Why Is It Important to Test Capacitors?
Capacitors are vital components in electronic circuits, handling tasks like signal smoothing and power regulation. Testing them regularly is key to avoiding equipment failures and keeping systems running smoothly.
A defective capacitor can lead to serious issues—causing system downtime, damaging other parts, and resulting in costly fixes and lost time.
Take, for example, a failed capacitor in a power supply. This can cause unstable voltage levels, potentially harming delicate components that rely on consistent power.
In industrial environments, such a failure could bring entire production lines to a stop, leading to major financial setbacks. In consumer electronics, even a single bad capacitor can disable a device entirely, impacting user satisfaction and damaging a company’s reputation.
Routine capacitor testing is a smart, cost-effective way to protect your equipment. Catching a failing capacitor early can prevent unplanned outages and reduce the need for emergency repairs.
Ensuring your capacitors are in good condition also enhances safety, helping to prevent electrical fires or other hazards. With regular checks, you can boost the reliability and lifespan of your systems—saving money, avoiding stress, and keeping everything running as it should.
How to Safely Discharge a Capacitor
Charged capacitors can be dangerous. If not handled correctly, they can deliver a powerful electric shock or damage nearby components. That’s why safely discharging a capacitor is a critical first step before testing, handling, or working on any circuit.
Step-by-Step Guide to Discharging a Capacitor Safely
- Identify the Capacitor Type Different capacitors may require different discharge methods. Electrolytic capacitors, often found in power supplies, can hold high voltage and must be handled with extra care.
- Turn Off Power and Isolate the Capacitor Make sure the circuit is powered off and the capacitor is disconnected from any power source. If possible, remove it from the circuit entirely.
- Use a Resistor for Discharging For larger capacitors, use a high-wattage resistor (e.g., 10k ohms, 5 watts) to slowly bleed off the charge. Connect the resistor across the terminals using insulated alligator clips.
- Monitor Voltage with a Multimeter Use a multimeter to measure the voltage across the capacitor. Wait until it drops close to zero before proceeding.
- Short Small Capacitors with Caution For low-voltage capacitors (under 50V), you can carefully short the terminals with an insulated screwdriver—but only if you're sure the voltage is low and safe.
- Confirm Full Discharge Always double-check with a multimeter to make sure there’s no residual charge before touching or working on the capacitor.
Tools and Safety Gear You'll Need
- High-wattage resistor – For controlled discharge
- Multimeter – To monitor voltage drop
- Insulated screwdriver – For discharging low-voltage caps
- Insulated alligator clips – For safely connecting the resistor
- PPE (Personal Protective Equipment) – Safety glasses, insulated gloves, and rubber-soled shoes
Safety Tips to Keep in Mind
- Never touch terminals directly – Even a small capacitor can deliver a jolt.
- Keep your workspace safe – Dry, non-conductive surfaces are a must.
- Know your circuit – Understand the voltage and rating of the capacitor before working with it.
- Use the right tools – Only handle capacitors with tools designed for electrical work.
By following these steps and using the right tools, you can safely discharge capacitors, reduce risk, and protect both yourself and your equipment.
Methods for Testing a Capacitor
There are several ways to test a capacitor, depending on the tools you have and the level of detail you need. Below, we’ll go through nine practical methods—starting with the simplest and moving toward more advanced techniques.
Method 1: Visual Inspection
Sometimes, a quick look is all it takes to spot a faulty capacitor. A visual check can reveal obvious signs of failure and help you decide if further testing is needed.
- Bulging: If the top of the capacitor is swollen or puffed up, it’s usually a sign of internal pressure caused by overheating or a short circuit.
- Leaking: Any fluid or electrolyte leaking from the capacitor indicates that it has likely ruptured—often due to over-voltage or physical stress.
- Burn Marks: Scorch marks, dark spots, or discoloration suggest overheating or electrical arcing, which can seriously affect performance.
If you notice any of these signs, the capacitor is most likely damaged and should be replaced right away to avoid causing problems in the rest of the circuit.
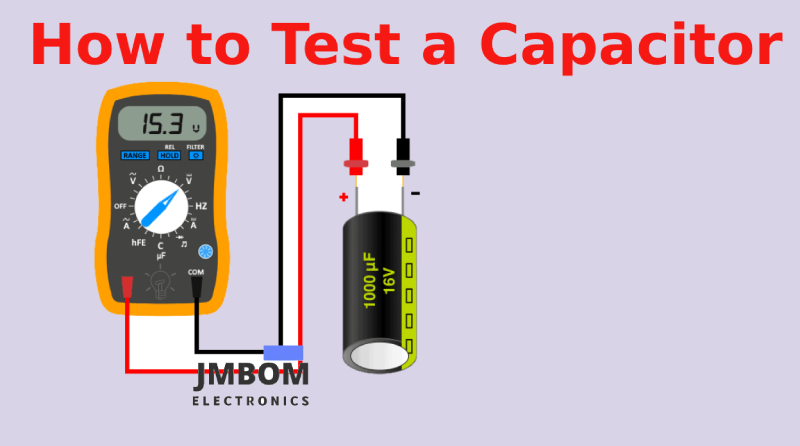
Method 2: Using a Multimeter with a Capacitance Setting
A multimeter with a capacitance mode allows you to directly measure a capacitor’s value and determine whether it's still within its specified range.
- Setup: First, make sure the capacitor is fully discharged. Set your multimeter to the capacitance mode—usually marked with a "C" symbol.
- Testing: Connect the probes to the capacitor terminals. If you're testing a polarized capacitor, connect the red probe to the positive lead and the black probe to the negative. Hold the probes firmly in place for an accurate reading.
- Reading the Results: The multimeter will display a capacitance value. Compare it to the rated value printed on the capacitor. If the result is within ±10% of the rated value, the capacitor is typically in good condition. A much lower reading or an “OL” (over limit) warning may suggest the capacitor is open or faulty. A much higher reading might point to a shorted capacitor.
If you're working in a professional environment or with sensitive electronics, high-quality meters like those from Keysight offer better precision and higher testing ranges, making them ideal for demanding applications.
Method 3: Using a Multimeter Without a Capacitance Setting
If your multimeter doesn’t have a capacitance mode, you can still do a basic check using the resistance (ohms) setting.
- Setup: Fully discharge the capacitor. Set the multimeter to the highest resistance range.
- Testing: Place the probes on the capacitor terminals. For polarized capacitors, match red to positive and black to negative. Observe the resistance reading.
- Reading the Results: A good capacitor will show a low resistance at first, then the reading will gradually climb toward infinity (open circuit). If the resistance stays low, the capacitor may be shorted. If the reading stays at infinity and never changes, it may be open or not charging at all.
- Limitations: This method won’t tell you the exact capacitance value and may not catch issues like reduced capacity or leakage. It’s best used for quick troubleshooting, not precise diagnostics.
Method 4: Using a Voltmeter
A voltmeter can help you check whether a capacitor is capable of holding a charge.
- Setup: First, fully charge the capacitor to its rated voltage using a DC power supply. Then disconnect it from the power source.
- Testing: Set your voltmeter to the correct DC voltage range, and connect the probes to the capacitor terminals. For electrolytic capacitors, be sure to observe proper polarity—red to positive, black to negative.
- Reading the Results: If the capacitor holds a voltage close to its rated value, it’s likely in good condition. A rapid voltage drop may indicate the capacitor is leaky or faulty. If there’s no voltage, the capacitor likely isn’t holding a charge and may be open or damaged.
- Use Case: This method is especially useful when diagnosing power supply circuits, as it gives you a quick check of the capacitor’s ability to store and retain charge.
Method 5: Measuring the Time Constant
The time constant method estimates a capacitor’s value by analyzing how quickly it charges or discharges through a known resistor.
- Concept: The time constant (τ) is calculated using the formula: τ = R × C, where R is resistance (in ohms) and C is capacitance (in farads).
- Setup: Connect the capacitor in series with a known resistor. Apply a voltage source to the circuit, and use an oscilloscope to monitor the voltage across the capacitor.
- Testing: As the capacitor charges, observe how long it takes the voltage to reach 63% of its final value. This time is equal to τ. Then calculate capacitance using the formula: C = τ / R
- Use Case: This method gives a reasonably accurate estimate of capacitance and is often used in labs and educational settings to understand a capacitor’s charging behavior.
Method 6: Using an ESR Meter
Measuring a capacitor’s Equivalent Series Resistance (ESR) is one of the most effective ways to assess its condition, especially in power supply circuits.
- Why It Matters: A high ESR means the capacitor’s internal resistance has increased—often due to aging or damage. This can cause poor circuit performance, overheating, or even failure.
- Setup and Testing: Ensure the capacitor is fully discharged before testing. Connect the ESR meter probes to the capacitor terminals. The meter will display the ESR value directly.
- Interpreting Results: Compare the reading to the typical ESR range for that type of capacitor (check the datasheet or a reference table). A low ESR is a good sign. A high ESR suggests the capacitor is degraded and should be replaced.
- Pro Tip: For high-accuracy measurements, especially in demanding circuits, Keysight LCR meters offer precise ESR and capacitance readings, making them a reliable choice for professional use.
Method 7: Leakage Current Test
This test is especially important for electrolytic capacitors, as it helps reveal internal wear or insulation breakdown.
- Why It Matters: Leakage current is the small amount of current that flows through the dielectric (insulating) layer of a capacitor. A small leakage current is normal. A large leakage current indicates insulation failure or serious degradation.
- Setup and Testing: Discharge the capacitor completely. Connect a DC power supply set to the capacitor’s rated voltage. Add a series resistor to limit current flow. Use a multimeter set to the microampere (µA) range to measure the current flowing through the capacitor. Compare the reading to the manufacturer’s leakage current specification. A significantly higher value means the capacitor is likely faulty.
- Safety Tips: Always discharge capacitors before handling. Use insulated tools, and wear protective gear like gloves and safety glasses to prevent injury.
Method 8: Using a Dedicated Capacitor Tester
A dedicated capacitor tester offers a fast and accurate way to evaluate a capacitor’s condition, going beyond the basics that a standard multimeter can provide.
- Why Use One: Capacitor testers are built specifically for this purpose. They can measure capacitance, ESR, and leakage current with high precision. Many models are also easier to operate and interpret than general-purpose meters.
- How to Use It: Make sure the capacitor is discharged. Connect the tester’s probes to the capacitor terminals. Select the desired test mode (e.g., capacitance, ESR, leakage). Start the test and read the results on the display. Compare the values to the capacitor’s rated specs to determine if it’s in good working order.
- Why It’s Valuable: These testers simplify the process, save time, and give detailed insight into capacitor health—making them a great tool for both professional technicians and electronics hobbyists.
Method 9: Traditional Shorting Method (Professionals Only!)
⚠️ Warning: This method involves high risk and should only be used by experienced professionals with proper safety measures.
- Dangers Involved: Electric shock: If the capacitor is charged, touching the terminals or shorting them without care can cause serious injury. Component damage: Improper discharge can damage the capacitor or nearby parts. Fire hazard: Large capacitors can release energy violently, creating sparks or even flames.
- How It Works: Confirm that the capacitor is charged. Using an insulated screwdriver, carefully short the terminals. Observe the spark or sound that results.
- Interpreting the Outcome: No spark or sound: The capacitor may be discharged or faulty. Strong spark and pop: The capacitor is likely holding a charge and may still be functional.
- Important Note: This is a very crude method that only checks if the capacitor can hold and release a charge—it does not provide any measurement of capacitance or health. Because of the danger involved, it should only be used as a last resort or in very specific troubleshooting situations by qualified professionals.
Comparison of Capacitor Testing Methods
| Method | Best Applications | Pros | Cons |
|---|---|---|---|
| Visual Inspection | Initial quick check | Fast and easy, no special equipment needed | Only detects obvious physical damage |
| Multimeter with Capacitance Setting | General capacitance measurement | Provides accurate capacitance readings | Requires a multimeter with capacitance measurement |
| Multimeter without Capacitance Setting | Quick, basic health check | Simple to use, no special equipment required | Doesn’t provide precise capacitance values |
| Voltmeter | Troubleshooting power supply circuits | Quick way to check if capacitor holds charge | Limited to testing voltage retention only |
| Measuring the Time Constant | Detailed analysis in circuit environments | Estimates capacitance from charging behavior | Needs an oscilloscope and known resistor |
| ESR Meter | Checking power supply capacitors | Measures Equivalent Series Resistance quickly | Requires a specialized ESR meter |
| Leakage Current Test | Testing electrolytic capacitors for degradation | Detects internal faults and insulation breakdown | Needs DC power supply and safety precautions |
| Capacitor Tester | Comprehensive and precise testing | Measures multiple parameters accurately | Requires a dedicated tester, which can be costly |
| Traditional Shorting Method | Quick check for professionals | Fast indication of charge retention | High risk of shock, equipment damage, and fire hazard |
How to Choose the Right Method for Testing Your Capacitor
Picking the right testing method and tools depends on a few key factors, like the capacitor’s type, its capacitance and voltage ratings, and the equipment you have available. Using the proper approach ensures accurate results and helps avoid damaging your components.
Here are some things to consider when choosing your testing method:
1. Capacitor Type
- Electrolytic Capacitors: These often benefit from tests like leakage current measurements or using an ESR meter to detect internal wear or breakdown.
- Ceramic Capacitors: Usually, a simple visual inspection combined with a capacitance check using a multimeter is enough.
- Film Capacitors: For these, more detailed methods such as time constant measurements or a dedicated capacitor tester can provide more reliable results.
2. Available Test Equipment
- Multimeter: Great for basic testing like visual inspection, checking resistance, or measuring capacitance if it has that feature.
- LCR Meter: Best suited for detailed testing, including accurate capacitance, ESR, and leakage current readings.
- Dedicated Capacitor Tester: Offers an all-in-one solution that’s easy to use and provides comprehensive data.
3. Purpose of Testing
- Quick Checks: If you’re just doing an initial assessment, simple methods like visual inspection or using a basic multimeter can save time.
- In-Depth Analysis: For a thorough evaluation, advanced tools like LCR meters combined with ESR and leakage current testing provide a full picture of capacitor health.
Additional Tip:
Consider buying refurbished testing equipment. It often delivers high-quality performance at a lower cost, giving you access to professional-grade tools without breaking the bank—perfect for accurate and reliable capacitor testing across various types and scenarios.
Troubleshooting Tips for Capacitor Testing
When a capacitor fails a test or behaves unexpectedly, it’s important to quickly identify the problem to keep your system running smoothly. Here are some helpful tips to guide your troubleshooting:
- Check Your Connections: Make sure all test leads and connections are secure. Loose or poor contacts can cause incorrect readings or intermittent results.
- Discharge Capacitors Safely: Always discharge capacitors fully before testing to avoid false readings and prevent electric shock. For high-voltage capacitors, use a resistor to discharge them safely.
- Look for Physical Damage: Inspect the capacitor carefully for any signs of damage like bulging, leaks, or burn marks. Physical defects usually mean the capacitor needs to be replaced.
- Compare with Specifications: Always compare your measurements to the capacitor’s rated values printed on its body or datasheet. Large differences often point to faults.
- Use the Right Test Settings: Double-check that your multimeter or testing device is set correctly for the measurement you’re performing. Using the wrong settings can give misleading results.
- Test at Different Frequencies: If you’re measuring ESR, try testing at multiple frequencies. Capacitors can behave differently depending on the frequency, so this helps get a more accurate picture of their condition.
Common Capacitor Testing Issues and How to Fix Them
| Issue | Possible Cause | Resolution |
|---|---|---|
| No reading on multimeter | Loose connections | Check and secure all connections, then retest |
| Incorrect capacitance value | Capacitor not fully discharged | Properly discharge the capacitor before testing again |
| High ESR | Capacitor has degraded | Replace the capacitor |
| Inconsistent readings | Faulty or uncalibrated test equipment | Verify, calibrate, or replace your testing device |
| Leakage current too high | Internal capacitor failure | Replace the capacitor |
Following these troubleshooting tips will help you effectively identify and fix common problems that occur during capacitor testing.
Capacitor Maintenance and Handling
Proper care and handling of capacitors are key to extending their lifespan and ensuring they perform reliably. Follow these best practices to keep your capacitors in top shape:
- Storage: Keep capacitors in a cool, dry place away from direct sunlight. Store them in anti-static bags to protect against electrostatic discharge and physical damage. Always maintain storage temperatures within the manufacturer’s recommended range.
- Handling: Always discharge capacitors before handling to avoid electric shock. Use insulated tools and wear protective gear like gloves and safety glasses. Handle capacitors gently to prevent damage to terminals or casing.
- Installation: When installing polarized capacitors (like electrolytics), double-check the polarity to avoid damage. Use the right tools to mount capacitors securely, and avoid applying excessive force. Verify that the capacitor’s voltage and capacitance ratings match the circuit’s requirements.
- Routine Testing: Make capacitor testing a part of your regular maintenance schedule. Check capacitance, ESR, and leakage current periodically to catch early signs of failure. Replace any capacitor that shows degradation or fails tests to prevent unexpected downtime or damage.
Ensure Capacitor Efficiency and Reliability with Expert Testing
Proper maintenance and testing are vital for dependable electronic systems. Whether you’re performing simple visual inspections or advanced ESR measurements, using the right tools and methods helps you avoid common issues and extend the life of your equipment.
Keysight’s premium used testing equipment offers accurate, trustworthy solutions that ease your concerns about sudden failures and provide fast, reliable results.
Investing in Keysight’s high-quality, affordable testers makes capacitor maintenance efficient and accessible. With Keysight, you get reliable results without breaking the bank—giving you confidence in the health and longevity of your electronic systems.
Related Articles
How Fingerprint Sensors Work and Where They're Used
Arduino Sensors: Types and Uses
Arduino Relay Module: How It Works, Circuit Diagram & Code
Plug Flow Reactor (PFR): Function, Design Principles & Common Uses
PIC Microcontroller Programming for Your Electronics Project
Fiber Optic Sensors: Types and Real-World Uses
ADC (Analog-to-Digital Converter) Module in PIC Microcontrollers
Types of Microcontroller Boards and Their Uses
What is a Fuse: Different Types and Its Applications
How to Use a Transistor as a Switch

Amanda Miller
Amanda Miller is a senior electronics engineer with 6 years of experience. She focuses on studying resistors, transistors, and package design in detail. Her deep knowledge helps her bring innovation and high standards to the electronics industry.
Subscribe to JMBom Electronics !


